
The best Starlink Wi-Fi extender in NZ is usually a mesh node rather than a plug-in extender: either one of Starlink’s own mesh routers or a third-party mesh system running with Starlink in bypass mode. The Router 3 in the Standard kit is rated for up to 297 m², but NZ walls, second storeys and sheds cut that quickly.
This guide is for Starlink households with dead zones upstairs, at the far end of the house or out in the shed. It starts with the free fix (router placement), then covers Starlink Mesh, third-party options and getting Wi-Fi to outbuildings. If you are still choosing a plan or kit, our Starlink NZ guide covers the basics.
Key takeaways
- The Router 3 is tri-band Wi-Fi 6, rated for up to 297 m² and 235 devices, with two Ethernet ports. The Mini’s built-in router covers up to 112 m².
- Move the router first. Central, high and out in the open beats any extender plugged in next to a router hidden in the garage.
- Starlink Mesh: place nodes one to two rooms apart, pair each directly to the main router, and stop at three; Starlink says more can reduce performance.
- Third-party mesh works with Starlink in bypass mode, but you can’t mix it with Starlink’s own mesh routers.
- For sheds and sleep-outs, buried Ethernet (up to 100 m) or a point-to-point wireless bridge beats trying to shout Wi-Fi across the yard.
In this guide
- How far does the Starlink Gen 3 router reach?
- Starlink router placement: the free fix
- Starlink mesh: adding Starlink’s own routers
- Starlink WiFi extender NZ options: mesh, extenders and powerline
- Best Wi-Fi extender for Starlink NZ: plan your set-up
- Getting Starlink Wi-Fi to the shed, garage or sleep-out
- Common mistakes with Starlink Wi-Fi
How far does the Starlink Gen 3 router reach?
Starlink’s specification sheet rates the Router 3 (the Gen 3 router in the Standard kit) for up to 297 m² and 235 devices, using tri-band Wi-Fi 6 with 4×4 MU-MIMO. That figure assumes open, ideal conditions. In a real New Zealand house, each of these takes a bite out of it:
- Brick veneer and concrete block walls, which absorb far more signal than timber and plasterboard.
- Foil-backed insulation, metal cladding and low-E glass, all of which reflect Wi-Fi.
- A second storey, because floors and ceilings are thicker than walls and the router’s signal spreads sideways best.
- Where the router sits. The Starlink cable often decides this, which is how so many routers end up in a garage or hall cupboard.
| Starlink router | Wi-Fi | Rated coverage | Wired ports | Mesh role |
|---|---|---|---|---|
| Router 3 (Standard kit) | Wi-Fi 6, tri-band | Up to 297 m², 235 devices | Two Ethernet LAN ports | Main router or mesh node |
| Starlink Mini (built in) | Wi-Fi 5 | Up to 112 m², 128 devices | One Ethernet port (Starlink plug) | Main router |
| Router Mini | Wi-Fi 6, dual-band | Smaller than Router 3 | One LAN, one WAN | Mesh node |
Older rectangular Gen 2 kits are different again: their router has no Ethernet port, so wired backhaul or a third-party router needs Starlink’s Ethernet Adapter. Our Starlink accessories guide explains which adapter fits which kit.
Starlink router placement: the free fix
Before you buy anything, move the router. Put it somewhere central, a metre or more off the floor, out of cupboards and away from the TV, the microwave and the hot-water cylinder. If the 15 m Starlink cable won’t reach a central spot, look at a 45 m Starlink cable (about $260 at Noel Leeming) before buying extra routers.
Then check the result. Starlink’s app has a Wi-Fi scanner that shows signal strength as you walk around, and our speed test run next to the router and again in the problem room shows how much you are losing. If the numbers are fine by the router and poor elsewhere, it is a coverage problem; if they are poor everywhere, look at the dish instead.
Starlink mesh: adding Starlink’s own routers
Starlink Mesh means adding more Starlink routers that pair with your main router and appear as one network, managed in the Starlink app. The Gen 3 mesh router is a second Router 3; the smaller Router Mini is the cheaper option for a room or two. Starlink’s mesh setup guide is specific about how to get the best from them:
- Place mesh nodes no more than one to two rooms apart, and keep at least one router central.
- Pair every node directly to the main router. Chained nodes, where one node relays through another, perform worse.
- Stop at three. Starlink says more than three mesh nodes can reduce performance.
- Nodes can pair wirelessly (the app pops up a new-node notification) or over Ethernet, which is faster and more reliable.
Starlink mesh routers only work with Starlink routers; they won’t join a third-party mesh system. In September 2026 NZ sellers were asking about $250 for a Router Mini and $380 for a Gen 3 mesh router, so check the shop in your Starlink account before buying elsewhere.
When a Starlink mesh router makes sense
Choose Starlink Mesh if you want everything in one app, need one or two extra points, and don’t need advanced features. It is the least fiddly option, and the Gen 3 mesh router’s two Ethernet ports are handy for a TV or console at the far end.
Starlink WiFi extender NZ options: mesh, extenders and powerline
A third-party mesh system with bypass mode
Any decent mesh system works as a Wi-Fi extender for Starlink. Plug the main mesh unit into one of the Router 3’s Ethernet ports, then switch on bypass mode in the Starlink app, which turns off Starlink’s Wi-Fi so you don’t end up with two competing networks. Read Starlink’s bypass mode article first, because changing it affects how the app manages the router. The alternative is to leave Starlink’s router in charge and run the mesh system in access-point mode. Our guide to mesh Wi-Fi systems explains how the main brands compare.
Either way, Starlink’s residential service uses carrier-grade NAT for IPv4, so a new router won’t give you port forwarding.
Plug-in Wi-Fi extenders
A single plug-in extender is fine for one dead spot, such as a back bedroom, but a repeater has to receive and resend the same signal, so speeds drop noticeably at the far end. Our Wi-Fi extender guide and TP-Link extender review cover which models are worth it.
Powerline adapters
Powerline adapters carry the network over your power circuits, which suits older homes where you can’t run Ethernet. Results depend on the age of the wiring and whether the rooms share a circuit. See our powerline adapters explainer.
Best Wi-Fi extender for Starlink NZ: plan your set-up
Use the planner to estimate how many Wi-Fi points your home needs and how to link them. It uses conservative coverage figures for New Zealand construction, not the best-case numbers on the box.
Starlink mesh planner
Tell us about your house and any outbuildings. We’ll estimate how many Wi-Fi points you need and the best way to link them.
Rule-of-thumb coverage per Wi-Fi point: about 120 m² in timber-framed homes, 90 m² with brick and 60 m² with concrete or foil-backed insulation, well below the Router 3’s 297 m² rating for ideal conditions. Starlink says more than three mesh nodes can reduce performance, and each should pair directly to the main router.
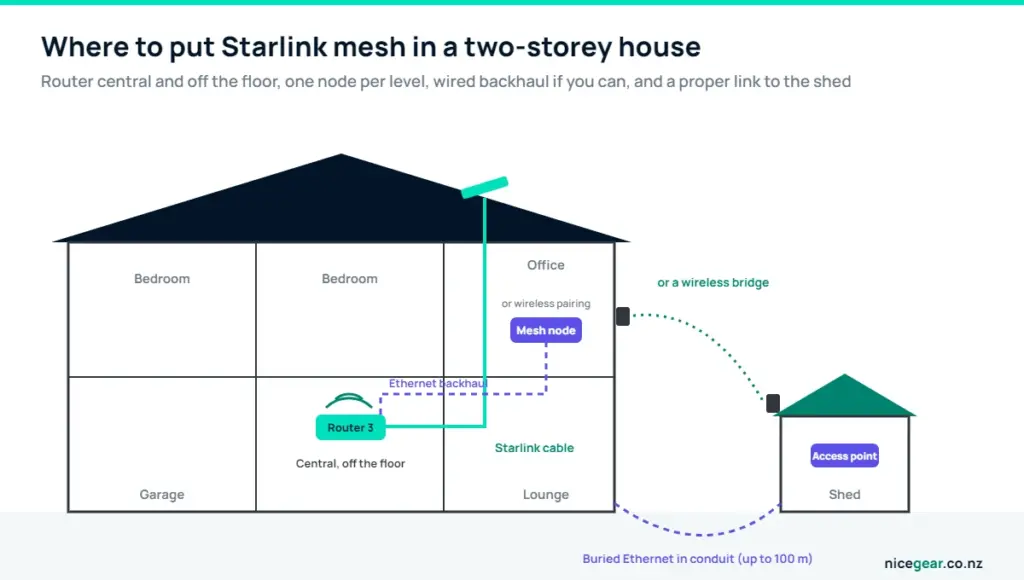
As a rough guide: a single-storey timber house under about 150 m² rarely needs more than a well-placed router; a two-storey home usually needs one node upstairs; and brick or concrete homes benefit most from wired backhaul, because every wall costs signal. If the Router 3’s two Ethernet ports aren’t enough for your wired devices and nodes, add a small switch; our network switch guide covers good options.
Getting Starlink Wi-Fi to the shed, garage or sleep-out
Wi-Fi rarely reaches outbuildings from inside the house, especially through a brick wall and a corrugated-iron shed. The options, from simplest to most robust:
| Option | Distance | Best for | Watch out for |
|---|---|---|---|
| Outdoor mesh node or access point | Up to about 20–30 m | Garage, sleep-out, patio | Needs a clear path; weatherproof model |
| Buried Ethernet plus access point | Up to 100 m | Workshops and home offices | Outdoor-rated cable in conduit, separate from power |
| Point-to-point wireless bridge | Hundreds of metres | Farm sheds, woolsheds, separate dwellings | Needs line of sight between the two ends |
| Powerline adapters | Same electrical installation | Quick trial | Often patchy between buildings |
An outdoor access point is the easy win for anything close; our outdoor Wi-Fi extender guide covers weatherproof models. For a workshop or office where you want full speed, bury outdoor-rated Ethernet cable in conduit and put an access point or mesh node inside. For longer runs across a paddock, a pair of point-to-point radios is the standard farm solution; our Ubiquiti guide shows how those links are built. Any new power circuits to a shed need a registered electrician.
Common mistakes with Starlink Wi-Fi
- Leaving the router in the garage and trying to fix it with extenders.
- Chaining mesh nodes instead of pairing each one directly to the main router.
- Adding a fourth or fifth Starlink node. Starlink says more than three can reduce performance; use wired access points instead.
- Mixing systems. Starlink mesh routers won’t join a third-party mesh, and two separate networks confuse devices.
- Ignoring the Ethernet ports. The Router 3 has two, and a wired node always outperforms a wireless one.
- Blaming Starlink for Wi-Fi. If the app says Online and a wired laptop is fast, the dish is fine.
Our take
- Start free: move the Router 3 somewhere central and off the floor, then test before buying anything.
- One or two dead zones: a Starlink mesh router is the simplest fix and stays in the Starlink app.
- Bigger or brick homes: a third-party mesh system with wired backhaul and Starlink in bypass mode gives you more control.
- Sheds and sleep-outs: use buried Ethernet or a point-to-point bridge, not a plug-in extender.
Coverage estimates are rules of thumb and your walls, layout and neighbours’ Wi-Fi all affect results. Specifications and prices were checked in September 2026. Nicegear is independent and has no commercial relationship with Starlink or any brand mentioned.
Sources and further reading
FAQs
What is the best Wi-Fi extender for Starlink in NZ?
For most homes, a mesh node beats a plug-in extender: either a Starlink mesh router or a third-party mesh system with Starlink in bypass mode. A plug-in extender only makes sense for a single dead spot close to the router.
Does the Starlink router work with mesh Wi-Fi?
Yes. You can add Starlink’s own mesh routers, or connect a third-party mesh system to the Router 3’s Ethernet port and turn on bypass mode. Starlink mesh routers can’t join a third-party mesh, so pick one approach.
How far does the Starlink Gen 3 router reach?
Starlink rates the Router 3 for up to 297 m² in ideal conditions. In practice, brick, concrete, foil-backed insulation and a second storey cut that substantially, so larger or multi-level homes usually need a mesh node.
How many Starlink mesh routers can I use?
Starlink’s setup guide says more than three mesh nodes can reduce performance. Pair each node directly to the main router and keep them one to two rooms apart.
Can I use a normal Wi-Fi extender with Starlink?
Yes, any standard Wi-Fi extender works with Starlink’s network. Expect lower speeds at the far end, because a repeater has to receive and resend the same signal.
How do I get Starlink Wi-Fi to my shed?
For a garage or sleep-out close to the house, an outdoor access point or mesh node usually works. For a shed further away, run outdoor-rated Ethernet in conduit (up to 100 m) or use a point-to-point wireless bridge with line of sight.
Do I need the Starlink Ethernet adapter for mesh?
Only with older Gen 2 kits, whose router has no Ethernet port. The Router 3 in the current Standard kit has two Ethernet ports built in.


