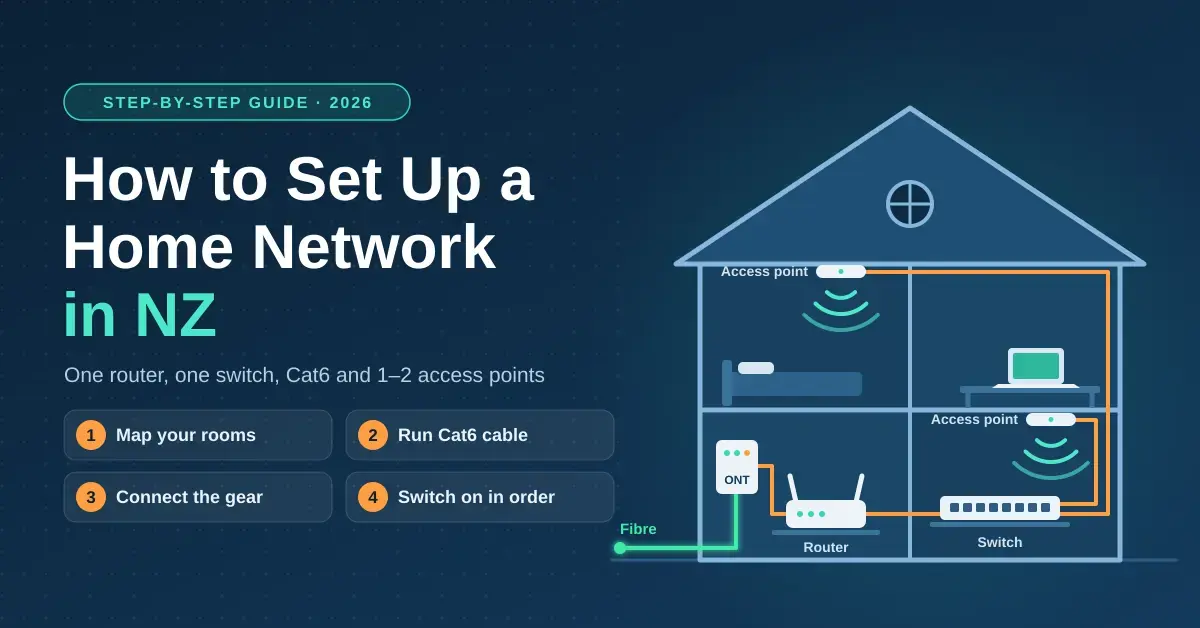
Setting up a home network in New Zealand is far simpler than most people expect, and it rarely needs expensive gear. The whole job comes down to one router, one switch, a handful of Cat6 cables and one or two access points — enough to cover almost any Kiwi house from the fibre box on the wall to the back bedroom. This guide works through it in plain steps, from mapping your rooms to switching everything on in the right order, with honest 2026 prices and the safety rules that apply here.
It assumes a fibre connection, which is how most New Zealand homes get online: about 76% of households where fibre is available are now connected to it, and the network passes roughly 87% of the country. If you are on Starlink or fixed wireless, the same plan works with your supplied modem in place of the ONT — our modem router guide explains what each connection type needs at the front door.
Key points
- One router only. Everything else is a switch or an access point — two routers doing NAT is the most common cause of mystery faults.
- Cable what stays put — TV, desktop, console, NAS, cameras and access points — and keep Wi-Fi for phones, laptops and tablets.
- Cat6 is the right cable for a 2026 NZ home: 2.5-gigabit over any household run, 10-gigabit over short ones, for cents more per metre than Cat5e.
- A PoE switch powers ceiling access points and cameras over the data cable, so no power points are needed in ceilings or eaves.
- You may run your own data cabling in NZ — keep it 50 mm clear of mains and leave anything inside the switchboard to an electrician.
What a home network actually is — and why one router matters
A home network is simply the set of cables, switches and wireless radios that let your devices talk to each other and to the internet. In a typical New Zealand home the internet arrives at an ONT (Optical Network Terminal), the small box a fibre technician mounts on an inside wall. From there a single router logs in to your internet provider, hands out addresses to your devices and runs the firewall that keeps the outside world out.
The single most important rule is that only one device should route. A router performs network address translation (NAT), the process that lets many devices share one public internet address. If you plug a second router into the first without changing its mode, you end up with two devices doing NAT — the classic cause of dropped connections, games that will not connect and cameras that vanish from their app. Everything beyond your one router should be a switch (which just adds more wired ports) or an access point (which just adds more Wi-Fi), never a second router.
Step 1: Map your house and list what needs a cable
Start with a notepad and walk the house. Mark where the ONT is — usually near the front door, in the garage or in the lounge — then list every device that stays in one place: the TV and its streaming box, a games console, a desktop or docked laptop, a printer, a network-attached storage drive, security cameras, a heat pump or solar inverter that connects to the internet, and any smart-home hub. Every one of these runs better on a cable than on Wi-Fi. (Wiring up a full home-theatre stack is fiddly enough that there is even a Wikipedia entry on hooking up home theatre, but on the network side each of these is just another device that prefers a cable.)
Then note the devices that move — phones, laptops and tablets — and, more importantly, where people actually use them. Those spots tell you where Wi-Fi access points need to go. The goal of the whole exercise is to cable the things that stay put and save Wi-Fi for the things that move.
Finally, decide where your network cupboard will live. It needs a power point, a little ventilation and a cable path back to the ONT; a hall cupboard, a laundry cabinet or a garage wall all work. If the ONT sits at one far end of the house, run a single cable from it to a central cupboard and put the router there instead of beside the ONT. This one move fixes more Wi-Fi complaints than any extender ever will.
Step 2: Choose one router — and put it in the right place
Your router does three jobs at once: it signs in to your provider (in New Zealand that almost always means tagging the WAN port with VLAN 10, the data lane every fibre company uses), it hands out local addresses, and it runs the firewall. It may also be your main Wi-Fi radio. For a Fibre 300 or Fibre Max plan, any Wi-Fi 6 router with a gigabit WAN port is plenty; a Hyperfibre plan needs a 2.5-gigabit or 10-gigabit WAN port to make use of the speed.
If your home is large or two-storey, buy the router as the first node of a mesh Wi-Fi system so you can add matching nodes later. Keep your provider’s supplied router only if it carries your landline phone; in that case leave it as the router, set your own gear to access-point mode behind it, and turn off its Wi-Fi. The rule never changes: exactly one box routes.
Wherever it ends up, give the router room to breathe. Out in the open, off the floor and away from large metal objects, mirrors and the microwave beats being hidden in a cupboard every time.
Step 3: Add a switch, and a patch panel if you can
Most routers have only four LAN ports, and a wired house needs more. An unmanaged gigabit switch with 8 or 16 ports costs between about NZ$40 and NZ$150, needs no setup and simply works — plug it into a router LAN port and every wired device plugs into the switch. If you plan to run ceiling access points or PoE cameras, choose a PoE switch instead: it sends power down the same data cable, so nothing in the ceiling or eaves needs its own power point.
When you pick a PoE switch, check its power budget in watts. A fixed security camera draws roughly 5–8 W, and a Wi-Fi 6 access point 10–20 W, so add up your devices and leave headroom. If you have a NAS or a fast desktop, look for a couple of 2.5-gigabit ports so those machines can move files faster than plain gigabit. Our network switch guide compares ports, PoE budgets and speeds in detail.
A patch panel is the tidy way to terminate the cables that run to each room: every in-wall cable ends on the panel, and short patch leads join panel ports to the switch. For a smaller job you can end cables in keystone jacks on a surface-mount box instead. Either way, terminate the room end in a wall plate rather than a bare plug, so the connection survives being pulled on.
Step 4: Run the cabling safely and to code
Buy solid-core Cat6 on a box for the in-wall runs and pre-made patch leads for the short hops. Cat6 is the sweet spot for a New Zealand home in 2026: it carries gigabit and 2.5-gigabit speeds over the full household distance of 100 metres, and 10-gigabit over shorter runs of up to about 55 metres — all for a few cents more per metre than older Cat5e. Cat6a is only worth it if you plan 10-gigabit links to a NAS or office; Cat8 is a data-centre cable with no real home benefit. Our guide to which Ethernet cable to buy explains the differences.
Good news for the budget: in New Zealand you are allowed to run your own data cabling. It is extra-low-voltage work, not restricted electrical work, so a homeowner can legally install it — unlike mains wiring, which must be left to a licensed electrician. The rules that keep it safe and legal are straightforward:
- Keep data away from mains. Extra-low-voltage data cable must sit at least 50 mm away from 230-volt power cables where they run alongside each other, and the two must never share the same hole, flush box or wall plate. More separation is better where you can manage it.
- Never open the switchboard. Anything inside the meter box or switchboard is electrician-only work. If a run has to pass near it, keep well clear.
- Route through the ceiling or under a suspended floor. Older weatherboard homes are easy; concrete slabs and two-storey builds usually mean fishing a cable up an internal wall cavity.
- Run two cables to each TV wall and office and one to every bedroom. The second cable costs a few metres, not extra hours, and saves adding a switch behind the TV later.
- Stay under 90 metres of in-wall cable per run (no house will trouble that) and avoid kinks, sharp bends and tight staples that crush the cable and wreck performance.
- Use outdoor-rated cable to a sleepout or garage — UV-stable and gel-filled, in conduit if it is buried — and fit an Ethernet surge protector at each end.
- Test every run with an inexpensive cable tester and label both ends before you close the walls.
If you want the detail behind these rules, WorkSafe covers who can legally do electrical work in New Zealand, and the separation and installation requirements come from the AS/NZS 3000:2018 Wiring Rules. The power-over-Ethernet standards that let one cable carry both data and power are published by the IEEE 802.3 working group. For the fibre side of things — where the ONT sits and how it hands off — see the fibre help and ONT information from Chorus.
Renting, or walls you cannot open?
You still have good options. Flat Cat6 tucked under carpet edges and along skirting, one long cable run through the ceiling to a single central access point, or a powerline adapter for the far end of the house all beat a daisy-chain of Wi-Fi extenders. Even a single cable to the middle of the house transforms coverage without a single hole drilled in a wall you do not own.
Step 5: Plan the Wi-Fi around the cables
Once the fixed devices are on cables, Wi-Fi only has to serve phones, laptops and tablets — and the job gets far easier. A single-storey home up to roughly 150 m² is usually fine with one well-placed router or access point near the middle. Larger or two-storey homes need a second access point, ideally a ceiling-mounted PoE unit or a mesh node fed by a cable, placed about where the far rooms begin.
Wireless mesh nodes (ones without a cable back to the switch) are the fallback for when running a cable is genuinely impossible. If you use one, put it where the signal is still strong, not out in the dead zone you are trying to fix — a node can only rebroadcast what it can hear.
Use a single network name across the whole house so devices roam smoothly, set up a separate guest network for visitors and cheap smart-home gadgets, and turn off the Wi-Fi on any provider router left in the chain purely as a phone gateway. A few settings genuinely help; our router settings guide covers channels, bands and the ones best left alone.
What to buy, and what it costs in New Zealand
The core kit is short and, once bought, lasts for years. The table below shows the main components, what to look for and a September 2026 New Zealand retail range for mid-range gear including GST. Cabling and jacks are cheap; the money goes on the switch and the access points.
Comparison
| Component | What to look for | Typical NZ price (Sep 2026, incl. GST) |
|---|---|---|
| Router (Wi-Fi 6) | Gigabit WAN for most plans; 2.5G/10G WAN for Hyperfibre; mesh-capable if the house is large | NZ$120–$400 |
| Unmanaged gigabit switch | 8–16 ports; no setup; add 2.5G ports if you have a NAS | NZ$40–$150 |
| PoE switch | 8–16 ports; enough watt budget for your cameras and access points | NZ$150–$400 |
| Wi-Fi access point (PoE) | Ceiling-mount, Wi-Fi 6, one per floor or wing | NZ$130–$350 each |
| Cat6 solid cable (305 m box) | Solid-core for in-wall runs; outdoor-rated for outbuildings | NZ$90–$220 |
| Keystones + wall plate (per point) | Cat6-rated jacks, terminated in a wall plate | NZ$12–$25 |
| Patch panel (24-port) | Optional but tidy; terminates every room cable in one place | NZ$40–$90 |
| Ethernet surge protector | One at each end of any run between buildings | NZ$20–$50 each |
For a rough whole-of-job figure, a do-it-yourself four-room house with a PoE switch and one extra access point typically lands around NZ$600–$1,200 in parts. If you bring in a cabler or electrician to pull the cables, add roughly NZ$120–$180 per run depending on how easy the ceiling and wall access is, which usually puts a full house between NZ$1,500 and NZ$3,000 installed.
Step 6: Switch it on in the right order
Bringing the network up in sequence saves a lot of guesswork:
- ONT to router. Connect the ONT’s data port (usually port 1) to the router’s WAN port, enter your provider’s settings — normally DHCP or PPPoE with VLAN 10 — and confirm a wired laptop reaches your plan speed on our broadband speed test.
- Router to switch. Run one patch lead from a router LAN port to the switch. From here on, everything wired plugs into the switch, not the router.
- Access points. Plug each access point into a PoE port, adopt it in its app or controller, set it to access-point mode with the same network name and password as the router, and disable the Wi-Fi on any provider router still in the chain.
- Fixed devices. Connect the TVs, consoles, NAS and cameras, and set each app to prefer the wired connection where the option exists.
- Reserve addresses. In the router’s DHCP settings, give the NAS, printer and cameras fixed (reserved) addresses so shortcuts, port rules and apps do not break when a device reconnects.
Step 7: Secure the network and write it down
A working network still needs locking down. None of this takes long, and it is far easier to do now than after something goes wrong:
- Change the router’s admin password from the factory default and turn off remote management from the internet.
- Use WPA3 encryption (or mixed WPA2/WPA3 if older devices complain) with a long passphrase. The Wi-Fi Alliance maintains the WPA3 standard, and a password manager is the easiest place to store it.
- Put cameras and cheap smart-home devices on the guest network, or on a separate VLAN if your router supports one, so a compromised gadget cannot see your computers.
- Do not forward ports to cameras or a NAS. Use the maker’s cloud relay or a private VPN such as Tailscale for remote access instead.
- Keep a one-page note in the network cupboard: provider settings, where to log in to the router, which patch-panel port feeds which room, and the reserved addresses.
Wired security cameras deserve a special mention: powered over PoE and plugged into the switch, they never drop off Wi-Fi, need no batteries and record continuously. Reserve Wi-Fi or battery cameras for the few spots a cable genuinely cannot reach.
Common mistakes when setting up a home network
Most home-network faults trace back to a short list of avoidable errors:
- Running two routers. Leaving the provider router as a router and adding your own as a second router creates a double-NAT tangle. Set the second box to access-point or bridge mode.
- Leaving the router by the front door. If the ONT is in a corner, the router broadcasts Wi-Fi from that corner. Run a cable to the middle of the house and relocate it.
- Chaining Wi-Fi extenders. Each wireless hop roughly halves throughput. One cabled access point beats three extenders.
- Bundling data with power. Running Ethernet in the same hole or cable tie as mains invites interference and breaks the wiring rules. Keep the 50 mm separation.
- Buying a flash router but no cable. A premium router cannot fix a house with no wiring. Spend on Cat6 and a switch first.
- Skipping the cable test. A single mis-punched pair can cap a run at 100 Mbps. Test and label every run before closing the walls.
- Forgetting the outbuilding surge protector. A cable between buildings can carry a surge in a storm. Fit an Ethernet surge protector at each end.
Which setup suits your home?
The seven steps scale up and down. Here is how the plan changes for common New Zealand situations.
Renters and no-drill homes
Skip the in-wall cabling. Run one visible cable to a central access point, use flat cable under carpet edges, or lean on a powerline adapter for a single distant room. You keep the one-router rule and gain most of the benefit without touching the structure.
Starlink and rural wireless homes
The plan is identical, with the Starlink or fixed-wireless modem standing in for the ONT. Because rural runs to sheds and sleepouts are longer, outdoor-rated cable, conduit and surge protection matter more, and a cabled access point in a second building often does more than any Wi-Fi upgrade.
Large or two-storey homes
Cable at least one access point per floor and feed each from the central switch. A wired backhaul between access points is the single biggest upgrade over an all-wireless mesh, keeping speeds high as you move between levels.
Home offices and gamers
Prioritise a wired link to the desk and the console. A cabled connection removes the jitter and dropouts that Wi-Fi adds, which matters most for video calls and online gaming; two cables to the office wall leave room for a small desk switch.
Disclaimer: Prices are indicative NZ$ retail ranges including GST seen in September 2026 and will change over time. Cabling guidance here is general; check the current wiring rules for your own situation and use a licensed electrician for anything involving mains wiring. Nicegear is independent and carries no paid placements.
Sources
Frequently Asked Questions
Can I run my own Ethernet cables in NZ?
Yes. Data cabling is extra-low-voltage work rather than restricted electrical work, so a homeowner can legally install it in their own home. The conditions are that it stays at least 50 mm from mains cables, never shares a hole or wall plate with power wiring, and that nothing is done inside the switchboard. Any work involving mains wiring must be done by a licensed electrician.
What cable should I use for a home network?
Solid-core Cat6 for the in-wall runs. It handles gigabit and 2.5-gigabit speeds over the full 100-metre household distance and 10-gigabit over shorter runs of about 55 metres. Cat6a is only worth the extra cost if you plan 10-gigabit links to a NAS or office, and Cat8 is a data-centre cable with no meaningful benefit in a home.
Do I need a switch if my router already has ports?
Once you want to cable more than three or four devices, yes. Routers usually have only four LAN ports, and an 8- or 16-port unmanaged switch is inexpensive and needs no configuration. Choose a PoE model if you want ceiling access points or cameras powered over the same data cable.
Where should the router go in the house?
As central as possible, out in the open and off the floor. If the ONT is at one end of the house, run a single cable from it to a central cupboard and place the router there rather than beside the ONT — this alone fixes most Wi-Fi coverage complaints.
How much does it cost to wire a house for Ethernet in NZ?
Doing it yourself, a typical four-room job with a PoE switch and one access point runs about NZ$600–$1,200 in parts in 2026. Paying a cabler adds roughly NZ$120–$180 per run depending on access, so a full house is usually NZ$1,500–$3,000 installed.