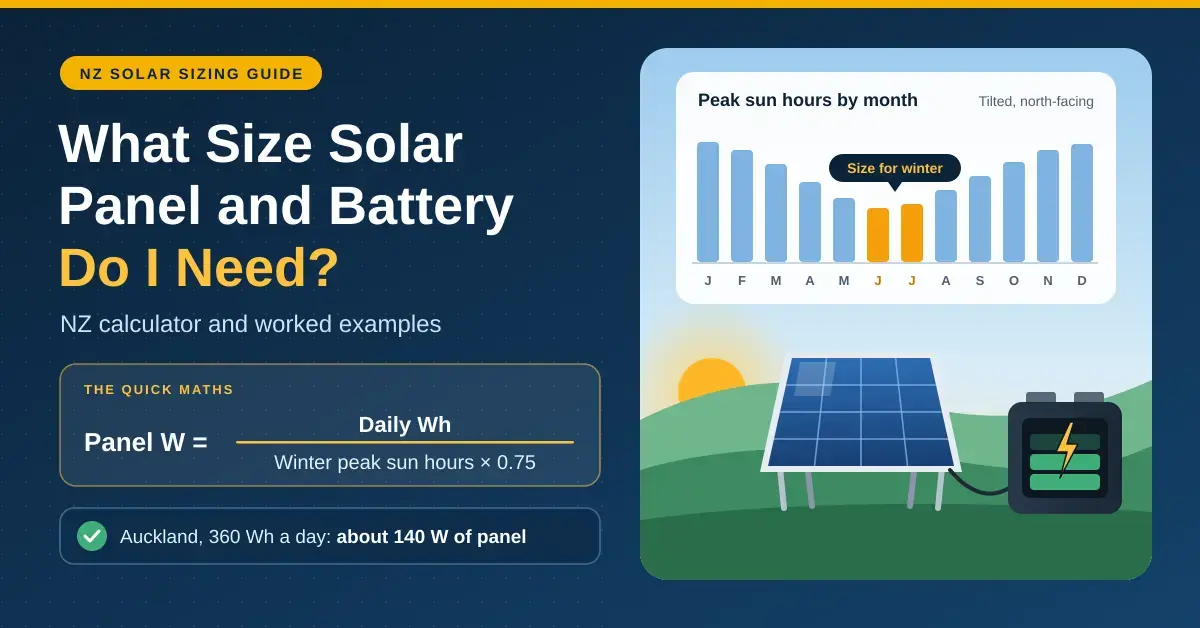
What size solar panel and battery do you need? Add up the watt-hours your gear uses each day, divide by the peak sun hours in your worst month, and allow about 25% for losses. This guide does that maths with monthly New Zealand sun data for nine centres, so you can size a system for a bach, shed, van, security camera or a Starlink Mini and know it will still work in the middle of winter.
The catch is always winter. The sun sits low and the days are short, so a system that is ample in January can run flat in June; size it for the months you actually need it. Further down we cover grid-tied home solar and payback, and if you are unsure how much power your house draws in the first place, start with our home energy monitoring guide.
Key takeaways
- Panel watts = daily Wh ÷ (winter peak sun hours × 0.75). A 360 Wh-a-day load in Auckland needs about 140 W of north-facing panel for year-round use.
- In June, a tilted north-facing panel gets roughly 2.4-3.5 peak sun hours in most centres (about 1.5 in mountain-ringed Queenstown), but a flat panel gets only 1.1-2.0.
- Battery Wh = daily Wh × days of backup ÷ usable share (about 0.8 for lithium, 0.5 for lead-acid). Divide by the system voltage for amp-hours.
- Keep DIY systems at extra-low voltage: WorkSafe says anything above 120 V DC or 50 V AC, and any 230 V wiring, needs a licensed electrician.
- For home solar, EECA puts a 5 kW system at about NZ$11,500 installed, paying back in 7-10 years if you use most of what it makes.
How to size a solar panel and battery
Every off-grid calculation follows the same five steps. Here they are worked through with a small real-world example: a Starlink Mini, some LED lights and phone and laptop charging at an Auckland-area bach that is used all year round.
- Add up your daily watt-hours (Wh). Multiply each load’s watts by the hours you run it. Starlink’s specification sheet rates the Mini’s average draw at 25-40 W, so 30 W for 6 hours is 180 Wh; add 20 W of LED lights for 4 hours (80 Wh) and 50 W of device charging for 2 hours (100 Wh) for a total of 360 Wh a day.
- Find the peak sun hours for your worst month. For a north-facing tilted panel near Auckland that is June, at 3.45 peak sun hours (kWh per m² per day). More on where these numbers come from below.
- Size the panel. Divide the daily Wh by the sun hours and by 0.75 for losses: 360 ÷ (3.45 × 0.75) = 139 W, so fit about 140 W, for example one 150 W panel.
- Size the battery. For two days of backup on lithium: 360 × 2 ÷ 0.8 = 900 Wh, which is 75 Ah at 12 V. A 100 Ah, 12 V lithium (LiFePO4) battery covers it with room to spare.
- Size the charge controller. Panel watts ÷ battery volts × 1.25 = 140 ÷ 12 × 1.25 = 14.6 A, so a 15 A MPPT controller, or 20 A if you might add another panel later.
The 0.75 factor covers the real-world losses between sunlight and stored energy: hot panels lose efficiency, dust and bird droppings shade the glass, cables and the charge controller waste a little, and the battery itself is not 100% efficient to charge. If you skip that allowance your system will always fall short of the paper figure.
Battery Ah to Wh, and what you can actually use
Watt-hours are amp-hours multiplied by voltage, but the number that matters is how much you can safely take out. Lithium iron phosphate (LiFePO4) tolerates deep discharge, so you can plan on using about 80% of its rated capacity; a lead-acid battery lasts far longer if you only use about half of it before recharging.
| Battery | Nominal voltage | Stored energy | Planning figure for usable energy |
|---|---|---|---|
| 100 Ah LiFePO4 | 12.8 V | 1,280 Wh | about 1,020 Wh (80%) |
| 100 Ah AGM lead-acid | 12 V | 1,200 Wh | about 600 Wh (50%) |
| 200 Ah LiFePO4 | 12.8 V | 2,560 Wh | about 2,050 Wh (80%) |
| 100 Ah LiFePO4 | 25.6 V | 2,560 Wh | about 2,050 Wh (80%) |
MPPT or PWM: which charge controller?
Use an MPPT (maximum power point tracking) controller for anything but the smallest trickle setup. Most solar panels are built to output 18-40 V, well above a 12 V battery, and an MPPT controller converts that surplus voltage into extra charging current, typically harvesting 20-30% more energy than a cheap PWM (pulse-width modulation) controller, which simply pulls the panel down to battery voltage and wastes the rest. PWM only makes sense with a small panel whose voltage already matches the battery. The controller amp rating in each of our examples is the panel wattage divided by battery voltage, with 25% headroom, then rounded up to the next standard size (10, 15, 20, 30, 40 A and so on).
Do you need an inverter?
An inverter turns 12 V or 24 V DC from the battery into 230 V AC for household appliances, and you only need one if your loads are mains-powered. Many off-grid setups avoid it entirely: LED lighting, USB charging, a 12 V compressor fridge and a Starlink Mini all run on DC, which is more efficient because it skips the inverter’s conversion losses and standby draw. If you do fit an inverter, size it to your largest simultaneous AC load, choose a pure sine wave model for anything with a motor or sensitive electronics, and switch it off when nothing is plugged in so it does not quietly drain the battery overnight.
Quick facts
| Panel sizing rule | daily Wh ÷ (worst-month peak sun hours × 0.75) |
| Battery sizing rule | daily Wh × days of backup ÷ usable share (0.8 lithium, 0.5 lead-acid), then ÷ voltage for Ah |
| Charge controller rule | panel W ÷ battery V × 1.25, rounded up to a common MPPT size |
| Design month, year-round use | June (New Zealand’s lowest sun) |
| Loss allowance | about 25% for heat, dirt, cabling, controller and charging losses |
| Go 24 V above | roughly 400 W of panels |
| Days of backup | 2-3 days for anything you rely on |
| Sun data source | EU JRC PVGIS (PVGIS-ERA5, 2005-2023) |
Peak sun hours in NZ, month by month
Peak sun hours are the daily solar energy landing on a panel, expressed as hours of full 1,000 W per m² sunshine. The figures in this guide come from the European Commission’s Photovoltaic Geographical Information System (PVGIS) (PVGIS-ERA5 data, 2005-2023), which models sunshine for any point on Earth and includes terrain shading from surrounding hills. That last point matters in New Zealand, where a valley or a mountain range can rob a site of winter sun.
| Centre | Best fixed tilt | June, tilted | June, flat | January, tilted | Yearly output per kW of panels |
|---|---|---|---|---|---|
| Auckland | 35° | 3.45 | 1.96 | 6.12 | 1,440 kWh |
| Hamilton | 36° | 3.19 | 1.81 | 5.84 | 1,340 kWh |
| Napier | 37° | 3.25 | 1.74 | 6.21 | 1,450 kWh |
| Wellington | 39° | 3.01 | 1.55 | 6.62 | 1,550 kWh |
| Nelson | 39° | 3.22 | 1.61 | 6.36 | 1,480 kWh |
| Christchurch | 41° | 3.01 | 1.40 | 6.41 | 1,490 kWh |
| Queenstown | 35° | 1.54 | 1.06 | 6.01 | 1,230 kWh |
| Dunedin | 42° | 2.54 | 1.17 | 5.82 | 1,360 kWh |
| Invercargill | 42° | 2.43 | 1.09 | 5.54 | 1,270 kWh |
Sun hours in the table are kWh per m² per day on a north-facing panel. Yearly output assumes a grid-tied system with PVGIS’s standard 14% losses. PVGIS-ERA5 is modelled on a fairly coarse grid, so local fog, cloud and hills can shift the real result at your address. For a site-specific estimate that folds in your own horizon, run your coordinates through NIWA’s free SolarView tool before you commit to a panel size.
Which way should solar panels face in NZ?
Face them true north, not magnetic north. A compass in New Zealand points roughly 20° or more east of true north, so use a phone map or a compass app set to true north. PVGIS puts the best year-round tilt at 35-42° across these centres. For a system that has to get through winter, err on the steeper side: a steeper panel catches more of the low June sun and sheds rain, dust and the odd dusting of snow. Flat panels on vans and boats are convenient, but in June they collect only about half of what a tilted panel does in most centres.
Worked examples for a bach, a camera and a campervan
Three common New Zealand setups show how the same five steps play out with very different loads and locations.
| Example | Daily use | Design sun hours | Panel | Battery (12 V lithium) | MPPT controller |
|---|---|---|---|---|---|
| Solar camera, Christchurch, all year | 120 Wh | 3.01 (June, tilted) | 60 W | 38 Ah for 3 days (fit 50 Ah) | 10 A |
| Starlink Mini at a Queenstown crib, all year | 360 Wh | 1.54 (June, tilted) | 320 W | 75 Ah for 2 days (fit 100 Ah) | 40 A (or 20 A at 24 V) |
| Campervan, Nelson, summer only | 640 Wh | 4.58 (March, flat) | 190 W | 134 Ah for 2 days (fit 150 Ah or more) | 20 A |
A solar-powered camera
A security camera and 4G router drawing an average of 5 W around the clock use 120 Wh a day. In Christchurch that needs a 60 W panel sized for June, and three days of backup rides out a long southerly. Our solar security camera guide covers the all-in-one cameras that ship with their own small panel, which suit lighter loads and save you sizing a system from scratch.
Starlink Mini at the crib
Running a Starlink Mini for 12 hours a day at 30 W takes 360 Wh. Around Queenstown, where the surrounding mountains cut winter sun to about 1.5 peak sun hours, that means roughly 320 W of tilted panels, or closer to 460 W laid flat. According to Starlink’s Mini specifications, the dish accepts 12-48 V DC, so it can run straight from a 12 V battery through a suitable DC cable and skip the inverter losses entirely. See our Starlink Mini guide for the hardware itself, and our Starlink NZ overview for how the service performs in rural areas.
A campervan in summer
A 12 V compressor fridge averaging 20 W, plus lights and charging, might total 640 Wh a day. With flat roof panels in Nelson used from November to March, the design month is March at 4.58 hours, giving about 190 W of panels and a 150 Ah or larger lithium battery. Size it for late summer, not midsummer, or the first cool, cloudy week of the trip will catch you out.
Off-grid solar in NZ: practical tips
Sizing is only half the job. These are the details that decide whether an off-grid system keeps working through a Kiwi winter.
- Frost and lithium. LiFePO4 batteries must not be charged below freezing. In Central Otago, Canterbury and high-country huts, choose a battery with low-temperature charge protection or a built-in heater, or keep it inside the insulated part of the building.
- Shade matters more than you think. A shadow across even part of a panel can cut its output sharply. Keep panels clear of trees and ridgelines, especially for the low winter sun, and clean off lichen and salt spray if you are near the coast.
- Go 24 V as systems grow. Above about 400 W of panels, a 24 V battery halves the current, which means thinner cables and a smaller, cheaper charge controller.
- Fuse everything. Fit a fuse or DC breaker close to the battery on every positive cable; a lithium battery can dump enormous current into a short circuit.
- Pick low-power electronics. An ESP32 that deep-sleeps between readings runs for weeks on a small battery, while a Raspberry Pi draws power constantly. Our Arduino vs ESP32 vs Raspberry Pi comparison covers the trade-off, and a Pi 5 can use its real-time clock wake alarm to sleep between jobs.
What you can wire yourself
WorkSafe’s guidance on DIY solar is that any system above 50 V AC or 120 V ripple-free DC, and anything involving 230 V terminations, must be installed by a licensed electrician, and the homeowner wiring rules (ECP 51) do not cover PV systems at all. The small 12 V and 24 V systems in the examples above stay under those limits, so you can legally build them yourself. Stand-alone systems should follow the AS/NZS 4509 standard, and WorkSafe recommends using a registered electrician for any PV installation if you are unsure.
Home solar in NZ: panel cost and payback
Grid-tied rooftop solar is a different calculation from off-grid: the goal is to cut your power bill, and the national grid acts as your battery. The benchmarks published by EECA, updated in December 2025, are the best independent New Zealand reference.
| System size | Panels | Typical installed price (incl. GST) |
|---|---|---|
| 3 kW | about 7 | NZ$8,500 |
| 5 kW | about 12 | NZ$11,500 |
| 10 kW | about 24 | NZ$20,000 |
| Battery add-on | – | NZ$5,000–15,000 extra |
EECA estimates a 5 kW system saves a home with electric heating and hot water about NZ$1,047 a year in Southland, rising to roughly NZ$1,467 in sunnier Marlborough. If your household uses most of what the panels generate, it expects a payback of 7-10 years. The key word is self-consumption: retailers pay far less for exported power than they charge you for imported power, so the win comes from running the hot water cylinder, dishwasher, washing machine and EV charger during the day, using timers or smart plugs where they help. From the PVGIS figures above, each kilowatt of well-placed panels makes roughly 1,230-1,550 kWh a year, so a 5 kW array produces around 6,100-7,700 kWh depending on where you live.
Grid-connected systems must be designed and installed by licensed electricians to AS/NZS 5033 and AS 4777.1, and your installer applies to the local lines company for approval to connect. The single best way to size a home system correctly is to measure your daytime use first, using smart-meter data or a clamp-on energy monitor, rather than sizing against your total annual bill.
Common mistakes when sizing solar panels and batteries
Most disappointing off-grid systems come down to one of these six errors, not to faulty gear.
- Sizing for summer. A system sized on January sun will fall short from May to August, exactly when you notice.
- Laying fixed panels flat. Fine on a moving van, but a fixed rooftop install loses up to half its winter output when it should be tilted north.
- Forgetting inverter standby draw. An inverter uses power even with nothing plugged in, so switch it off when idle, or run 12 V appliances directly where you can.
- Treating lead-acid amp-hours as usable. A 100 Ah AGM battery gives only about 50 Ah before it starts wearing out quickly.
- Using a PWM controller with large panels. Most household-size panels run at 30-40 V; an MPPT controller turns that extra voltage into charging current, where a cheap PWM controller simply throws it away.
- Skipping days of backup. A run of grey days is normal in a New Zealand winter, and one day of storage is rarely enough for gear you actually depend on.
Disclaimer: Sun data is modelled and your site may differ; prices and standards were checked in September 2026 and change often. This is general guidance, not an electrical design or financial advice. Work above extra-low voltage, and all grid-connected solar, must be carried out by a licensed electrician. Nicegear is independent, sells nothing and has no paid placements.
Sources
Frequently asked questions (FAQ)
What size solar panel do I need to charge a 100 Ah battery?
It depends on how much you use each day, not just the battery size. Replacing about 1,000 Wh a day, most of a 12 V 100 Ah lithium battery, needs roughly 390 W of north-facing panel in Auckland in June, but only about 220 W in January when the days are long.
How many solar panels do I need for a house in NZ?
EECA’s benchmarks range from about 7 panels (3 kW) to 24 panels (10 kW), with 12 panels (5 kW) a common middle size. Size the array to your daytime electricity use, because exported power earns far less than imported power costs.
How long does solar take to pay back in NZ?
EECA estimates 7-10 years if your household uses most of the electricity the panels generate. Payback is slower if a large share of the output is exported at low buy-back rates.
Can I install solar panels myself in NZ?
You can build small extra-low-voltage systems, such as 12 V or 24 V off-grid setups under 120 V DC. WorkSafe requires a licensed electrician for systems above 120 V DC or 50 V AC, anything involving 230 V terminations, and all grid-connected solar.
Can solar power a Starlink Mini?
Yes. Starlink rates the Mini at 25-40 W on average with a 12-48 V DC input, so 8 hours a day at 30 W is 240 Wh, which needs about 100 W of tilted panel in Auckland in June plus a battery for night-time use and cloudy days.