
The Starlink accessories NZ buyers actually need are simpler than the shop listings suggest. The current Standard kit’s Router 3 already has two Ethernet ports, so an Ethernet adapter is only needed with older Gen 2 kits. What usually matters is a proper mount, the right cable length, a switch for extra wired devices and some backup power.
This guide is for new Starlink owners working out what to buy and for anyone upgrading an older kit. Prices are typical NZ retail figures checked in September 2026. For the bigger picture on plans and coverage, see our Starlink NZ guide, and for the full cost of getting connected, our Starlink price guide.
Key takeaways
- Gen 3 Ethernet is built in. The Router 3 has two latching Ethernet ports; you don’t need the Starlink Ethernet Adapter.
- Gen 2 kits need the adapter for any wired device or third-party router, because their router has no Ethernet port.
- Cable length: the kit cable is 15 m. Replacement 15 m and 45 m Starlink cables cost about $140 and $260; never cut or join one.
- Power: the Standard dish averages 75–100 W on a 100–240 V supply. A UPS with about 200 Wh usable gives you 1.5–2 hours.
- Mounts: wall, pivot and pipe mounts run $140–$190 at NZ retailers.
In this guide
- What’s in the Starlink kit (and what you don’t need to buy)
- Starlink accessories NZ checklist: what to buy
- Starlink Ethernet adapter: do you need one?
- Starlink cable length and replacement cables
- Starlink routers: Router 3, Router Mini and mesh
- Starlink power supply, UPS and backup power
- Starlink mounts in brief
- What to check before you buy Starlink accessories
What’s in the Starlink kit (and what you don’t need to buy)
The current Standard Kit (Standard 4 X) contains the dish, a kickstand, the Router 3, a 15 m Starlink cable, a 1.5 m AC cable and the power supply. The Router 3 is tri-band Wi-Fi 6, rated for up to 297 m² and 235 devices, with two latching Ethernet LAN ports. The Starlink Mini kit is simpler still: the dish has the router built in and comes with a kickstand, a 15 m DC power cable and a mains power supply.
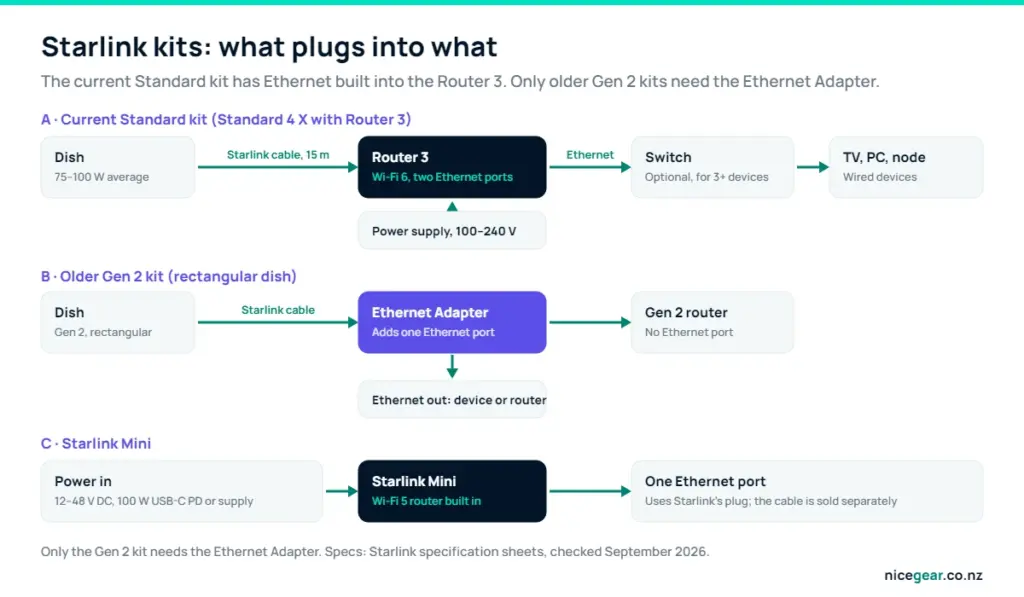
That means plenty of accessories sold online are for kits you don’t have. Before buying, check which kit is on your roof: the current Standard dish is a flat rectangle on a kickstand with a separate Router 3, while older Gen 2 kits have a motorised rectangular dish on a mast.
Starlink accessories NZ checklist: what to buy
Tell the checklist about your kit, where the dish will go and what you plug in, and it lists what to buy with typical NZ prices.
Starlink accessory checklist
Answer six questions and get a shopping list of the accessories your set-up actually needs, with typical NZ prices.
Typical NZ prices checked September 2026: Noel Leeming for Starlink cables, mounts and routing kits; third-party NZ sellers for Starlink mesh routers. Switch and UPS prices are our estimates. Items marked “price varies” aren’t included in the total.
Starlink Ethernet adapter: do you need one?
Starlink Gen 3 Ethernet: built in
No adapter needed. Plug a TV, games console, desktop PC or a mesh node straight into one of the Router 3’s two Ethernet ports. If two ports aren’t enough, add an unmanaged gigabit switch; our network switch guide covers good small models, and our Ethernet cable guide explains which cable category to buy.
Gen 2 kits: the Starlink Ethernet Adapter
The Gen 2 router has no Ethernet port at all, so Starlink sells a small Ethernet Adapter that sits in the cable between the dish and the router and adds one wired port. You need it for any wired device, for wired mesh backhaul, or to connect your own router. It is only for Gen 2 kits; it does nothing for a Router 3.
Starlink Mini: one port, special cable
The Mini’s built-in router has a single latching Ethernet port that uses Starlink’s own plug, and the matching cable isn’t in the box. For more than one wired device, add a switch after it. Our Starlink Mini NZ guide covers the Mini’s power and mounting accessories in more detail.
Starlink cable length and replacement cables
The Standard kit includes a 15 m Starlink cable between the dish and the Router 3. The cable uses sealed, proprietary connectors, so don’t cut or splice it; if it doesn’t reach, replace it with a longer Starlink cable. Typical NZ prices in September 2026:
| Cable or part | Typical price | Use it for |
|---|---|---|
| Starlink cable, 15 m (replacement) | $140 | Replacing a damaged kit cable |
| Starlink cable, 45 m | $260 | Dishes on a far roof, pole or outbuilding |
| Starlink Mini USB-C cable, 5 m | $59 | Running a Mini from a USB-C PD power bank |
| Starlink Mini DC power cable, 15 m | $60 | A longer or spare Mini power lead |
| Masonry routing kit | about $98 | A sealed cable entry through brick or block |
Prices from Noel Leeming’s Starlink range. If the dish needs to be more than 45 m from the house, move the router instead: put the Router 3 somewhere near the dish with a power point, such as a shed, and run outdoor-rated Ethernet (up to 100 m) back to the house.
Check the generation before you buy
Starlink cables and routers are generation-specific. Cables for Gen 2 kits aren’t interchangeable with the current Standard dish’s cable, and Gen 2 accessories such as the Ethernet Adapter aren’t needed with the Router 3. Match the product listing to your kit.
Starlink routers: Router 3, Router Mini and mesh
The Router 3 is the router in the current Standard kit, and it can also be bought as a mesh node. The Router Mini is a smaller dual-band Wi-Fi 6 router with one LAN and one WAN port, used as a cheaper mesh node for a room or two. Starlink says mesh nodes work best one to two rooms apart, paired directly to the main router, and that more than three can reduce performance. In September 2026 NZ sellers were asking about $250 for a Router Mini and $380 for a Gen 3 mesh router; check the shop in your Starlink account first.
You can also use your own router or mesh system. Plug it into a Router 3 Ethernet port and switch on bypass mode in the Starlink app, which turns off Starlink’s Wi-Fi so the two networks don’t compete. Our Starlink Wi-Fi extender guide goes through when each approach makes sense.
Starlink power supply, UPS and backup power
The Standard kit’s power supply accepts 100–240 V at 50–60 Hz, so it plugs straight into a normal New Zealand socket, and the dish averages 75–100 W. That draw is the number to plan around:
- Starlink UPS sizing: runtime is roughly the UPS’s usable battery capacity divided by the load. A unit with about 200 Wh usable runs a 100 W Starlink for around 1.5–2 hours; double the battery for double the time.
- Choose a UPS that can handle the load continuously with headroom, and plug in only the Starlink power supply and anything else you need online, such as a mesh node.
- Long outages: for rural properties with regular cuts, a battery and inverter system or a generator changelover is the real answer. The Mini, at 25–40 W and 12–48 V DC, is far easier to keep running.
- Have a fallback. One NZ’s Satellite TXT service uses Starlink’s direct-to-cell satellites for texting from compatible phones when both the power and the mobile network are down.
Our Starlink outage guide covers what else to check when the connection drops.
Starlink mounts in brief
The kickstand is fine on a lawn or deck with a clear view of the sky, but it isn’t designed for permanent mounting. NZ retailers sell wall, pivot roof and pipe mounts for the current dish for about $140–$190, and a Starlink pipe adapter lets the dish sit on a standard pole, the easiest way to clear shelter belts. Retailers also offer installation, at about $189 for a standard setup and $289 including wall mounting at Noel Leeming. Near the coast, use stainless or galvanised fixings, and if you are getting on the roof yourself, follow WorkSafe’s working-at-height guidance.
What to check before you buy Starlink accessories
- Buying an Ethernet Adapter for a Router 3. It is a Gen 2 accessory; the Router 3 already has two ports.
- Buying the wrong cable generation. Match the listing to your dish; the current dish uses different cables from Gen 2 kits.
- Cutting or joining the Starlink cable to reach further. Buy the 45 m cable, or move the router and run Ethernet.
- Underpowering a Mini. USB-C power banks must supply 100 W (20 V at 5 A) with Starlink’s USB-C cable.
- Skipping the mount. A dish that moves in the wind drops out; a proper mount costs less than the frustration.
- Buying from overseas sellers to save a few dollars. A local retailer makes Consumer Guarantees Act claims straightforward if something fails.
Our take
- Current Standard kit: you probably need a mount and maybe a switch. Skip the Ethernet Adapter.
- Gen 2 kit: the Ethernet Adapter is the one accessory worth buying if you want anything wired.
- Long runs: buy the 45 m Starlink cable, or put the router near the dish and run Ethernet.
- Rural power cuts: a UPS is cheap insurance; for long outages, look at a Mini on 12 V as a fallback.
Prices are typical NZ retail figures checked in September 2026 and change often. Nicegear is independent, sells nothing and has no commercial relationship with Starlink or any retailer mentioned.
Sources and further reading
FAQs
Do I need an Ethernet adapter for Starlink Gen 3?
No. The Router 3 in the current Standard kit has two Ethernet ports built in. The Starlink Ethernet Adapter is only needed with older Gen 2 routers.
How long is the Starlink cable?
The Standard kit comes with a 15 m Starlink cable. A 45 m replacement is available for about $260 at NZ retailers if your dish is further from the router.
Can I cut or extend the Starlink cable?
Don’t cut or splice it: the connectors are sealed and proprietary. Buy a longer Starlink cable, or move the router closer to the dish and run Ethernet to the house.
Can I use my own router with Starlink?
Yes. Connect it to one of the Router 3’s Ethernet ports and turn on bypass mode in the Starlink app. Gen 2 kits need the Ethernet Adapter to connect a third-party router.
What UPS do I need for Starlink?
Size it for about 100 W of continuous load with headroom. Roughly 200 Wh of usable battery runs a Standard Starlink for 1.5–2 hours, and runtime scales with battery size.
What is the Starlink Router Mini?
It is a small dual-band Wi-Fi 6 router from Starlink with one LAN and one WAN port. It is mainly used as an extra mesh node, and NZ sellers were asking about $250 for one in September 2026.


